Tuesday, November 6, 2012

Quiet Book, Pt. II

Pages 7 & 8:

Gum ball matching colors. I appliqued everything using Wonder Under, then stitched around the edges. This is the part where I share the best quiet book tip of all: clear thread. You must buy it. I started switching threads every two seconds when I first started, but I discovered how easy it was to keep my machine threaded with clear thread.

The gum balls snap on and off and she can match the colors. I sewed the snaps on using my machine and lowering the feed dogs.

Inspiration here.

I found stiff felt in sheets at JoAnn's. It's cool stuff! I just sewed the frosting to the bottoms of the cupcakes with a tight zig zag, and they seem to hold up great. She used beads, but I had this silly little spangles in my stash, so I hot glued them. You are supposed to count the sprinkles and match it to the number on the cupcake liner. 


Pages 9 &10:

This was one of my first pages. I think decorating a Christmas tree is fun, so that's where I thought of this idea. The snowflakes are actually buttons. I used a cute decorative stitch on the ribbon too. They go on and off with Velcro. 

Inspiration here.

I love this one. The zipper is a cute addition.  Pretty self explanatory I think.


Page 11 & 12:

Hours of entertainment, right? I debated whether or not to add a place to put an extra "O", but I decided against it in the end. Do you see how the Velcro is attached with that cool little circle? That's a stitch on my machine. I'm sure it has a fancier purpose, but it worked for me.

I made mini batting sandwitches for the "X"'s and "O"'s, then just free-handed the letters with a tight zig zag. 

I love this one. It was my own idea to to an "I Spy" page. I think my daughter will love sitting and searching for stuff. I can imagine her doing this with a friend and seeing if they can find what the other sees. Can you find the harmonica?

These scraps were all in my stash. I ironed them on with Wonder Under and stitched around each edge.

I bet you're wondering how I got all the edges to finish like this. No pictures, sorry. Well, it's the basic idea you use for a lot of things. Like when you make a receiving blanket or something. You just put two pages together, right sides together, sew around the edges leaving a space to turn it right side out. Turn it right side out, push out the corners. Then you iron it and top stitch around the edges. 

I did add some thick interfacing to the back of each page to make it heavier. BUT, if you're going to do that, cut the interfacing smaller than your page--close to the finished size. If you try to sew two layers of interfacing together and flip it, the corners will be too bulky. It will be hard to get to lay right. 

I added a tag to show it was our family's, and that's it!

It really was such a fun project. A lot of work, but I think my daughter will really get a lot of good miles out of it.

Monday, November 5, 2012

Quiet Book, Pt. I

Phew. Just finished this baby. Making a quiet book like this is a bit like childbirth. A lot of work in the moment, and you're sooo glad when you're done. But so worth it in the end, of course.

I thought it would be great to make something homemade for Annie for Christmas, and I've had my eye on tons of quiet book ideas for ages. I came up with some of the ideas on my own, but I got most my inspiration from blogs and Etsy. I think the important thing is to just do it how you like it, and tailor it to your kid's needs.

I really wanted to make this so the pages are removable. That way I could divvy them out among a few kids in the future, without fighting over one book. I just bought book rings at Walmart and made button holes in each page. They measure about 9x12" before finishing. Also, if she outgrows a page or ruins it, it's easily replacable. 


Pages 1 & 2:

I originally found the idea for this one here
Tying is a little advanced for a 1 1/2 year old, but I thought it was cute. I pretty much winged the shape of the ballet shoe out of felt. I had some leftover black ribbon from my party, so that's what I used for the ties. I added a little decorative stitch on the ribbon for fun.

Button flowers. I just used scraps I already had around my sewing room. The blue was actually already pieced like that, so I just cut out my shapes, sewed the blue to the green, and made my stems. The key on this one is to use all the same button sizes so all the flowers are interchangeable. I have an automatic button hole on my machine, so when I figured out the size of the first one, I was able to do all of them after that without adjusting anything. 


Pages 3 & 4:

Originally found the idea a few years ago on Homemade by Jill. Love her. Once again, I just winged it. I could have used ribbon as a border, but I didn't have any so I just zig zagged on some felt I cut into thin strips. The top window pops down and opens too. The finger puppet templates are also on Jill's website.

Mmm. Pie. I originally found this idea on a food-themed quiet book here, which was cute. This is a fun weaving activity. I used my pinking shears to make the zig zag edges on the crust. I love the food fabric underneath.


Pages 5 & 6:

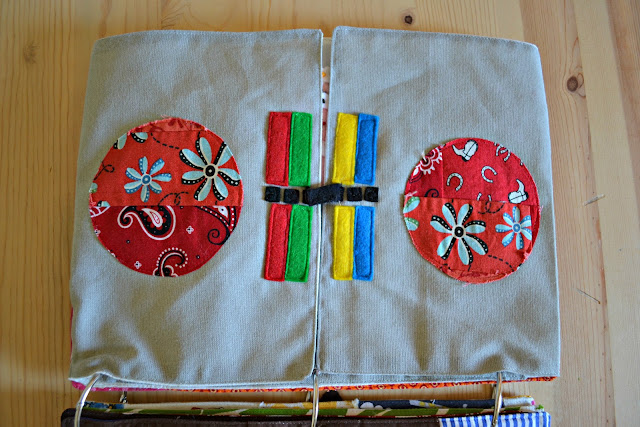
My kid is mildly obsessed with Yo Gabba Gabba. So of course, I had to make DJ Lance's boom box. This page was tricky because I had to rig it so it would open up. I ended up just making a whole separate boom box that was a tiny bit smaller, and attaching it to a base page that was the right size. See the base page? It's that orange/red print you can barely see.

Are those not the cutest finger puppets ever??
I kind of guessed on the sizes after doing the barn animals. I embroidered on the details, like Toodee's mouth and Brobee's stripes. Pretty sure this is my favorite page. 

Original idea here
I wanted to do other root vegetables, but I made the pockets too small so I had to stick with all carrots. I did the button holes in the brown first, and sewed pockets after using a piece of fabric on the back of the page. I put a tiny piece of floral wire between the front and back sides of the carrots, so they would be stiff enough to poke down the holes.

And that's it for today.... More quiet book to come.

Thursday, November 1, 2012

Will's Pilot Costume

I offered to make Will's costume this year. I thought it would be fun to try to follow a pattern, and Annie's costume was already done. I was happy to do it!

It's from this McCall's pattern. It was pretty idiot-proof, even for a non pattern-sewer like me. Except I messed up even before I got it home. I was very meticulous at the fabric store, buying the right notions and fabric, calling and texting reinforcements before I committed... 

I got it home and I had bought the wrong size.
Ooops.
Luckily JoAnn's was still having it's $.99 sale on McCall's patterns, so I just went and bought another. 

 The hardest part was the collar, but Kat helped me with it. We thrifted the white turtle neck. I think it totally makes the outfit (as do the sunglasses).

 JoAnn's had some amazing iron-on patches. I think little touches like this really make it look professional. And that is my first real zipper. Thank you, thank you.

Handsome boy.
I think he really liked it.

This whole thing makes me appreciate my mother and how talented she is at sewing apparel. Quilting is so easy compared to all the technicalities of a pattern. I enjoyed learning it though.

Costumes!

 Isn't Halloween the best?! I get so excited every year! This year I wasn't pregnant and sick, so I found myself sewing all four of our costumes this year. (You too can finish a moose head if your husband leaves out of town for a couple days :) Read the funny details and see more pics on our blog:

www.higgtastic.blogspot.com

Costumely,
Carrie