Tuesday, October 30, 2012

Camera Strap Cover

These nylon straps aren't the most comfortable, so I set out to re-cover mine.
I like the idea of re-covering as opposed to replacing because it can be washed or changed out if I get tired of it.

First, I measured how wide my strap was. This will be different for everyone. Then I just added .5" to my measurement for seam allowance. 

I gathered scraps in varying lengths, but cut them all to the same width--around 1.5" You could do this with one big piece of fabric, but I wanted it to feel scrappy.

I sewed them all together until I had enough to cover the length of my strap (about 20"+).  After those were all pieced, I cut a strip of thin batting that was 1.25". I wanted to limit the bulk in the seams so that's why I cut it smaller than my fabric. 

 This is me making sure that it will fit. It should be about half the width of your batting, so when you fold it it fits snugly after seam allowance.

I chose to quilt in straight lines down the length of the whole thing. Then I just folded the raw edges on the ends over and stitched them for a finished look. Here's where I skimped too much. I wish I would have added a bit of wiggle room as far as the length goes. I ended up maybe .25" too short. But it's hardly noticeable. 

Here's what the finished piece looks like before you sew it to make the tube.

 I sewed right sides together and turned the whole thing. The easiest way for me to turn is to attach a large safety pin to one side of one end and use that to thread back through the tube. You could use a real turner thing, but I don't have one. It took a little work, but the finished piece looks great. 

After doing this, I think another easy way to do it is to just iron down your edges .25" and top stitch the whole thing, wrong sides together.

Thread it on, and there it is. 
A softer more stylish strap. 

Monday, October 29, 2012

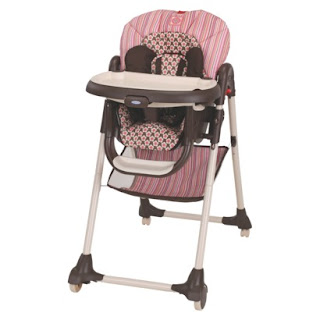
High Chair Cover

By Kathryn
(Sorry, I don't know why the pictures are being crazy...)

My friend wanted me to recover her high chair cover. 
It was girly, and now she wanted it for her baby boy. 

I had never attempted this kind-of project, but my friend was sure I could figure it out. 
I found basic instruction from this website, then tailored it to fit my needs.

We choose dark brown for the seat, to make the food hide better, 
and all the fabric is washable.I made button holes so the straps could still fit through, and secured them through all layers. Following guides from the original cover, I ran a stitch where the seat would need to fold, making it fit nicely into the high chair.

We added rick-rack trim for fun, and bias tape to finish the edge. 
Next time I would use larger bias tape because it is easier to work with. 

It was fun to help my friend with something I had done before, 
and she was so excited with the end result. 


Sunday, October 28, 2012

Mummy's Night Out

So I threw a themed party. I love the idea of Witches' Night Out in Bunkerville, so I did my own twist with a few of my close friends.

Invite. 
Rob helped me burn the edges. I like how it turned out. I wrapped it in cheesecloth when I mailed it to add that extra special touch. I think if you send out a rad invite, people are more likely to come. It kind of sets the mood.

I printed out some really cute labels here.
We had Deadly Night Crawlers (gummy worms), Dragon Eyes (Oreo truffles), Decomposing Eels (Red Vines), Zombie Teeth (Jelly Bellies), and Pickled Bat Guano (Queso Blanco chip dip). 

And these cupcakes. I die for this frosting recipe. It's not that syrupy sweet stuff you get at the bakery. It's a little lighter. 

Fun night.

Friday, October 19, 2012

Chapter Book Bag

By Kathryn 

For birthdays lately, I have been making purses for my daughter's friends. It's cheaper, cuter, and way better than some toy that will be lost or broken. 

This one is for Hannah- she loves fairies and baking.


It has a ruffle flap. 

And a pink, secret pocket

This is the strap-- a trim I had leftover. 
Using trim or rick-rack is SO much easier and quicker than making a strap from fabric!

We personalized it with an appliqued "H." 
(I didn't do a "D" last time- curves are much harder!)
I interfaced the orange square, the letter, and the fairy fabric, to add strength. 

My favorite part about this project is working with my daughter on it. She really wants to learn to sew, and it's fun to share the skills. 

I also loved that we used no pattern, just ideas I had done before.
It's great to be able to make it just the width and length we wanted.

One more thing that made it nice? All the materials were from my stash. 

It's a quick, unique, personal gift we know she will love!


Tuesday, October 9, 2012

You Can Make This Quilt

Another quilt post. Sorry. I'm kind of on a roll here.

This one was for Adam and Kari's baby boy, due in November. Have I mentioned how fun baby quilts are? They're so fast. No pieced back. No pieced batting. It's lovely. I whipped this one out in two or three days I think.

I found the idea for this one on a favorite blog I follow. It's called a "Strip and Flip" quilt because as you can see, you just piece the strips together and when you are done, you cut out that middle section and flip it. That's it. The best part is that you only need tiny little strips of your 44" wide fabric to make it work. If you're a beginner quilter, this would be a great project for you.

 New wavy line quilting method. You can do this with your normal foot. No need for any fancy quilting stuff. And almost all the fabric is from Walmart (shhh....don't tell).

 Striped binding. Again, I'm addicted.

 Rob says the back is borderline girly. I think it's so manly and cool.

Likey.

Monday, October 8, 2012

At the Fair

by Kathryn


I entered some sewing items at my county fair and won blue ribbons on all of them, and the Sweepstakes on this:


Check out the fair here, or the costume details here. And As Aunt Betty says, it's always fun to know the inside looks as good as the outside! :)

Wednesday, October 3, 2012

Ding Dong! The Witch is Dead

I pinned this on Pinterest ages ago, but this was the first year I found the time to make this little project. (I can't find the original source I had, but this one's pretty close). All you need is a pair of red shoes, some striped tights, batting, and a picture frame. Really simple.

I searched for the perfect pair of pumps for ages. I found these babies at The Goodwill. Sidenote: they're actually close to my size, so I think they might look amazing with a very festive Christmas dress. Ha ha. But I digress...

I spread Tacky glue on them and sprinkled super fine Martha Stewart red glitter.  Tip: when you're sprinkling sparkles, use and old ad or magazine like I did. That way you can just fold the middle when you're done glittering and all the excess slides back into the bottle. After it was dry, I covered it with a coat of Mod Podge. That way the sparkles don't come off. (I also did that to a pair of flats I bought Annie from Payless, and it worked like a charm!)

As far as the legs go, I found striped tights online here. I had to order some other stuff for costumes, so it was worth the shipping. But I'm sure you could find something similar at Target or something. I suppose you could use plain tights, but I don't think you'd get the same effect. Just stuff them with batting.

 Then I just made a sign on my computer. I sized this one 5x7"

I attached it to my house with Command Strips that come off after you're done with them. I didn't want to put a hole right by my doorbell.

And that's it. Pretty cute fall look if I may say.

Tuesday, October 2, 2012

Kaleidoscope Baby

Another quilt done. I made this for John and Christine's baby that will be here in November. I seriously loved making this one. It was something different. I found the pattern here. She originally put circles on hers, but I decided I didn't like that look as much. Plus, I didn't want to cover up my points! They looked too good :)

You use paper templates to cut out the star shapes, then you piece half the square together on a diagonal. Sounds complicated, but it was actually really simple. I think if I were to do it again, I wouldn't do the greens so scrappy. I think it looks better uniform in a solid color. 

The quilting is my favorite part. I tried out this Dogwood quilting pattern, and it ended up being a ton of fun. 

Rounded corners and a pieced back. 
Again.